
Studio Process Blog: Dragon
This is a project that I have been wanting to do for a long time since I have been at school. Once I found my interest within surface texturing, I started really analyzing what it takes for cg assets such as characters or props to achieve a believable level of photorealism when they are on screen.
I would hear Q&A's from other artists in the industry and ask other surfacing artists the same questions to hear their methodology into how they would texture their assigned assets. The part that really start making lightbulbs go off in my head was that even though each texture artist was saying that once their part was done, the detail they put into the maps can be utilized by other departments to further enhance what the asset will look like. On the surface it is a easy concept for a production creating photo real things, but once I started researching more, it seemed that the avenues of finding ways to get more and more detail out of texturing was endless.

For my studio project I wanted to focus on trying to achieve creating photo real skin for a dragon model that I purchased on the TurboSquid website. The asset itself had a lot of perks to it even before I purchased it. It has a rig that can be utilized, and higher level of mesh detail in it, and some of the pre built maps that come with the mesh have some detail that can still be utilized. The only previous map I will still be using for this project will be the displacement map because of how the silhouette is on the dragon and certain cervices and dips that are modeled into the mesh, keeping the original displacement map will be the most beneficial for me. Other than displacement, I will be able to personally create my own unique maps that I will be able to further use in other programs such as maya and nuke to further my final result.
Process of Applying Surface Detail


For my texturing process, I am really excited to say I will be using some texturing xyz multi channel displacement maps to be texturing the surface of this dragon. I wanted to go for a really unique texture on the surface so it would feel like you could reach out and know what the creature feels like when touching it. Above are the color maps which I will use a little but I wanted to show these image because I wanted to present the level of detail that are in the images I will be using. Multi channel maps are cool because depending on how one uses the RGB channels when texturing, you can use various areas and channels of the image to create unique surfaces with amazing amounts of detail. I chose an ostrich foot, frog skin, and a crab like back with varying sharp areas. Combing al of these different maps together and painting in differing detail and color is going to be a great learning process while at the same time testing my skills as a junior visual effects artist.
Inspiration behind project


When discovering the inspiration for creating this project, I wanted to watch a lot my favorite films or tv shows that had a really cool skin effect on dragons. The first part of inspiration that came to mind was watching the Harry Potter series again. In the final film and in the 4th film, there are a couple scenes depiciting the size and scale of the dragons that could exist in the wizarding world. With combination of everything else such as lighting, atmosphere, and overall scene and shot presentation, the production of the film was able to utilize what they know about cameras and apply and shot continuity to apply it to a mythical creature to achieve the best look. I always that that the Harry Potter dragons looked amazing possess and insane amount of detail.
Another seires I have really gotten into watching and rewatching has been Game of Thrones. Seeing the show all the way through for the first time, I couldnt remember another show that made me feel that excited watching the episodes and hanging on the the cliffhanger for the next episode. In the show you see the dragons grow from birth to adult hood size, and along with that, you see their color palette vary more as they age, scale distribution start to change and gain more uniqueness, and the overall level of detail increase as the show went in, seeing the improvements in prouduction.

For a more natural referance when creating this project, I wanted to look at all the different species of lizard that we have on our planet, and pick apart specific parts of what makes them authentic and what makes them stand out. I came across the kamodo dragon trying to find color ways that I was going to use on the project, and I became obsessed with the surface detail on these giant reptiles. From a distance their scales look sun bleached or faded, but once you're close up everytime you look you see a new color or an area of detail you were glossing over when observing the photo.

Another reptile that I discovered when researching was the Armadillo Lizard. These lizards are so cool because they seem like a dragon in their own right. A defense mechanism that the lizard has is it grabbing the end of its tail and rolling its pointy scales outward more to protect itself. The color palette from these reptiles shows so many unique color ways that could be used and seeing how light affects the different kinds of lizards has been really beneficail when coming to deciding where light is going to go through or if color will be different in those areas. The progress of the dragon is going to be uploaded weekly so everyone can follow me along this journey of trying to create skin and discovering more about surface texturing.
3D Process of preparing asset
The process of preparing the dragon has been a very long process and still continues to be a constant work in progress. Since I will be using Mari for a majority of the dragon texturing, I have updating the UV layouts to see what best optimizes the dragons potential. Every time I export out of Maya and bring back into Mari, it seems like a never ending circle of changing UV layouts and seeing how I can use patch mode within in Mari on the UDIM's to optimize the best detail.

While its been a long process of changing the UV tiles over and over again, I am really undersstanding my asset better whil at the same time seeing unique ways I can UV this asset use the tiles for cool detail in the future. Utilizing the UDIM potential in Mari has help broaden my abilities to see what parts of my workflow can be more procedural, and how much can be hand painted on there.
Preparing masks and maps
One of the unique things that I am trying to do in this project is combine some of the texturing xyz maps within nuke, so that when I am doing procedural placement and using some of substance painters baked maps, I can have more unique placement of where I can place the textures. When I merge the normal, displacement, cavity, and specular, it produces this pink map the even through switching between the RGB channels, they will still use that newly layered detail. This map is a tiled frog texture that I will be using as a procedural for the dragon.

Here is a screenshot of what some of the things I have been running into when adjusting and cutting new UV layouts. While using patch mode, I believe I can select different patches and control procedural sizes in those tiles, but the overall look will ultimately come back to how the UV's are cut on the dragon. I like some of the placement because it it's starting to make the dragon feel more life like, but the density of how much certain UV's take up their tiles is very noticeable on the dragon.

Continuing Displacement
The displacement map progress is going quite nice right now. The hardest part is trying to keep consistent values going around big scales and trying to keep the UV tile seems look like there isn't paint over that area. Currently I have two color channels acting as procedurals over a majority of the dragon right now. I have a mask that is blocking most of the horns and talons to the scale displacement isn't crossing over to much. It is also going to not be over the wings as much. I am in the process of seeing a couple different ways to get some vein detail in there so when a hard light hits it there's some nice subsurface in that area.


Currently this is how my displacement is looking. It's starting to become a repetition of masking out certain areas and moving painted areas around so they start blending in with the bigger scales all over the dragon. I am liking the layout of the scales so far and am almost done with a pass of the displacement and bump. The next process is going to be exporting the mesh and the texturing xyz maps out of Mari and bringing them into zbrush so I can starting mass extruding the scale detail.
Below I created a look development file in Maya so I can start building a shader of the dragon in the process of still texturing it. When discovering Mari, one of the main parts I've liked about using the tool so far is how seamless it feels putting it into my workflow and feeling a freedom with creating maps and masks. I really like the progress so far and am really enjoying the displacements working at such high detail.
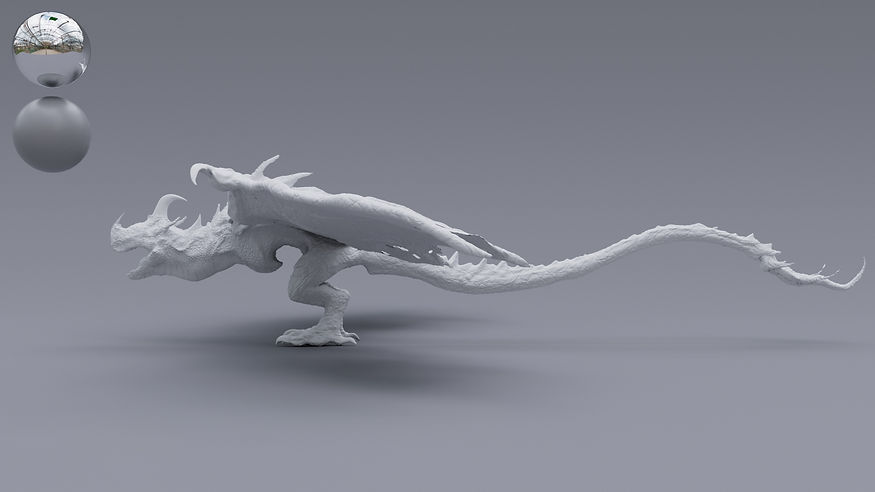


I have imported the model into zbrush now from Mari. I was able to utilize a udim importer plugin made by a man name Jake Harrell. He created a tool that reads your objects udim tiles within Zbrush so you don't have to individually put them on, so it has been a really big time saver. The one problem I am currently running into within Zbrush is I believe the padding is having a negative effect on my displacement maps when I import them into Zbrush. The maps import fine, but I have to use negative values to somewhat display my displacement. I know that padding is used to help make seams less noticeable, but I believe that Zbrush is picking up those extended values and it is making the displacement act the incorrect way. I believe there has to be 50% linear gray encompassing the area where the padding is, but I am not sure at the moment.


ZBRUSH Section
I was able to figure out the issue with importing my Mari displacement images into ZBrush. I kept mass importing all of my exr images and ZBrush was having a trouble recognizing them. My fix was I had to switch my displacement maps to TIFF images and had to individually import them one at a time into separate layers. After I did that I was able to see what areas I needed to sculpt over to cover noticable UV seems.

Before
After

After I am done sculpting I will be re exporting a new displacement map, along with a normal map and a cavity map out of ZBrush and importing them into Mari so I can plug them into my shader to get ready to use for color shortly after this. The image below is what the exported cavity map looks like in Mari. Once it is mixed with the new displacement I will be able to have a lot more freedom of what areas I can apply color and roughness to.

Look Development
I have made two different color renditions of the dragon so far. The first one uses a lot of earthy tones with hints of green while the other is a darker tone blur with with hints of white and green and red in the maps. I noticed that the resolution of the maps is starting to get a tiny bit pixelated so I am going to take the color maps into nuke and blur them the tiniest bit to get rid of a bit of the pixilation.


With the blue rendition of the dragon, I also enabled subsurface scattering in the mesh to see how light affects the dragon as a whole. I like the patchy look in the wings of parts being more solid then others, I need to go back and blur parts of the wings so some of the patches aren't as severe.
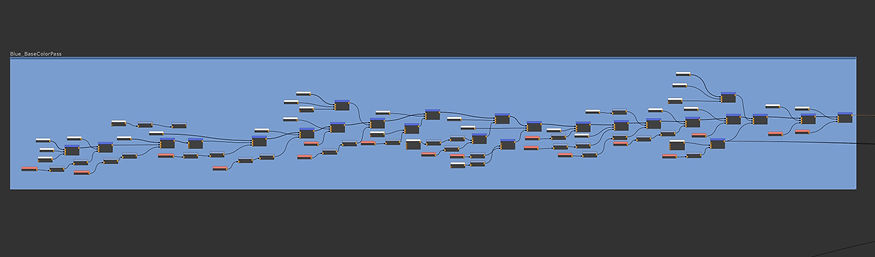
This was the base color pass for the blue dragon inside of Mari. I have been reusing the cavity and displacement maps to make masks to vary the color on the dragon. I started using gradients as masks and blending them with my ZBrush masks to apply detail to more dense parts of the dragon. Below is the inspiration and big reference for the blue dragon. It is a blue iguana and I was fascinated by the red crack detail between the scales and the subtle color changes on the iguanas surface. It has been a really helpful and amazing reference to use for this project so far.


Final Render
I am so happy with the final render looks like. I can't believe how far I have come with this dragon and all of the problems that raised out of the mesh. This project taught me so much more about the texturing and look development process and I was able to learn and incorporate Mari and Zbrush into my texturing workflow. I also loved utilizing texturing xyz multi channel aminal maps. The detail in the images is unreal and I recommend everyone try and use them with texturing any animals or creature models. The project is the starting point of my long journey to fully use these maps and new texturing workflow to the fullest potential.